
The Best Royal Icing Ever Recipe
Introduction
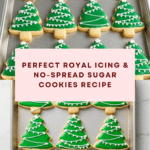
These no-spread sugar cookies paired with smooth royal icing are perfect for any occasion. The cookies hold their shape beautifully, while the icing adds a glossy, customizable finish. Decorate them simply or get creative with colors and designs.

Ingredients
- 1 cup (226g) unsalted butter, softened
- 1 cup (200g) granulated sugar
- 1 large egg, room temperature
- 1 teaspoon pure vanilla extract
- 3 cups (375g) all-purpose flour
- 1 teaspoon baking powder
- ½ teaspoon salt
- 4 cups (480g) confectioners’ sugar, sifted
- 3 tablespoons meringue powder
- ½ teaspoon cream of tartar
- 6–8 tablespoons warm water
- 1 teaspoon clear vanilla extract (optional)
- Gel food coloring, as desired
Instructions
- Step 1: In a medium bowl, whisk together the flour, baking powder, and salt. Set aside.
- Step 2: In a large mixing bowl, beat the softened butter and sugar on medium-high speed for 3–4 minutes until light and fluffy.
- Step 3: Beat in the egg and vanilla extract until combined.
- Step 4: Reduce mixer speed to low and add the dry ingredients in three parts, mixing just until no streaks of flour remain.
- Step 5: Divide the dough into two disks, wrap tightly, and refrigerate for at least 1 hour.
- Step 6: Preheat oven to 375°F (190°C). Line baking sheets with parchment paper.
- Step 7: Roll out one chilled dough disk on a lightly floured surface to ¼-inch thickness. Cut desired shapes and place them on the prepared sheets.
- Step 8: Bake for 8–10 minutes, until edges are lightly golden and centers are set.
- Step 9: Cool cookies on the pan for 5 minutes, then transfer to a wire rack to cool completely before decorating.
- Step 10: To make the royal icing, whisk warm water and meringue powder in a clean bowl until dissolved.
- Step 11: Add cream of tartar and the optional clear vanilla extract.
- Step 12: Add all the confectioners’ sugar at once and beat on low speed for 10 minutes until thick, smooth, and glossy.
- Step 13: Divide the icing and color as desired with gel food coloring. Thin with small amounts of water to achieve outlining or flooding consistencies.
- Step 14: Decorate completely cooled cookies and allow the icing to dry for 6–8 hours or overnight before stacking or storing.
Tips & Variations
- For firmer outlines, use less water in your royal icing and add thin icing for flooding to create smooth finishes.
- Try flavoring the sugar cookies with lemon or almond extract for a twist.
- If you don’t have meringue powder, pasteurized egg whites can be used but ensure safety precautions are followed.
Storage
Store decorated cookies in an airtight container at room temperature for up to one week. Avoid stacking them until the icing is completely dry to prevent smudging. To keep cookies longer, freeze undecorated cookies for up to 3 months and decorate after thawing.
How to Serve

Serve this delicious recipe with your favorite sides.
FAQs
Can I make the dough ahead of time?
Yes, you can prepare the dough and refrigerate it tightly wrapped for up to 3 days or freeze for up to 3 months before rolling out and baking.
How do I fix royal icing that is too thick or thin?
If the icing is too thick, add a few drops of warm water and mix well until you reach the desired consistency. If it’s too thin, add more sifted confectioners’ sugar gradually until it thickens.
Print
The Best Royal Icing Ever Recipe
- Total Time: 1 hour 30 minutes
- Yield: Approximately 24 cookies, depending on size 1x
- Diet: Vegetarian
Description
This recipe features a classic batch of No-Spread Sugar Cookies paired with the Best Royal Icing Ever, perfect for beautifully decorated cookies that hold their shape and provide a smooth, glossy finish. The sugar cookies are soft, buttery, and subtly sweet, while the royal icing dries hard with a delicate sheen, ideal for detailed decorations and vibrant colors.
Ingredients
For the No-Spread Sugar Cookies
- 1 cup (226g) unsalted butter, softened
- 1 cup (200g) granulated sugar
- 1 large egg, room temperature
- 1 teaspoon pure vanilla extract
- 3 cups (375g) all-purpose flour
- 1 teaspoon baking powder
- ½ teaspoon salt
For the Royal Icing
- 4 cups (480g) confectioners’ sugar, sifted
- 3 tablespoons meringue powder
- ½ teaspoon cream of tartar
- 6–8 tablespoons warm water
- 1 teaspoon clear vanilla extract (optional)
- Gel food coloring, as desired
Instructions
- Mix Dry Ingredients: In a medium bowl, whisk together flour, baking powder, and salt, then set aside.
- Cream Butter and Sugar: In a large mixing bowl, beat the softened butter and granulated sugar on medium-high speed for 3–4 minutes until the mixture is light and fluffy.
- Add Egg and Vanilla: Beat in the egg and vanilla extract until fully combined, creating a smooth batter.
- Incorporate Dry Ingredients: Reduce the mixer speed to low and gradually add the dry ingredients in three parts, mixing each addition just until no streaks of flour remain to avoid overmixing.
- Chill Dough: Divide the dough into two disks, wrap tightly in plastic wrap, and refrigerate for at least 1 hour to firm up for easier rolling.
- Preheat Oven and Prepare Baking Sheets: Preheat your oven to 375°F (190°C) and line baking sheets with parchment paper to prevent sticking.
- Roll and Cut: Roll out one chilled dough disk on a lightly floured surface to about ¼-inch thickness. Use cookie cutters to cut out desired shapes and place them on the prepared baking sheets.
- Bake Cookies: Bake the cookies for 8–10 minutes, or until the edges are lightly golden and the centers appear set but not browned.
- Cool Cookies: Allow the cookies to cool on the baking sheet for 5 minutes before transferring them to a wire rack to cool completely, ensuring they are ready for decorating.
- Prepare Royal Icing Base: In a clean bowl, whisk the warm water and meringue powder together until dissolved thoroughly.
- Add Stabilizers and Flavor: Stir in the cream of tartar and, if using, the clear vanilla extract to enhance flavor without altering color.
- Incorporate Confectioners’ Sugar: Add all the sifted confectioners’ sugar at once and beat on low speed for about 10 minutes until the icing becomes thick, smooth, and glossy, perfect for decorating.
- Color and Adjust Consistency: Divide the royal icing into separate bowls and tint with gel food coloring as desired. Thin icing with small amounts of water to reach the right consistency for outlining or flooding.
- Decorate Cookies: Use the prepared royal icing to decorate completely cooled cookies, allowing your creativity to shine with detailed designs.
- Dry Icing: Let the decorated cookies dry for 6–8 hours or overnight before stacking or storing to ensure the icing hardens properly without smudging.
Notes
- Ensure the butter is softened at room temperature for proper creaming and texture in the cookies.
- Use meringue powder instead of raw egg whites for a more stable and food-safe royal icing.
- The amount of water for the royal icing can be adjusted slightly to achieve different consistencies for piping details or flooding areas.
- Gel food coloring is preferred to avoid thinning the icing with liquid colors.
- Store decorated cookies in an airtight container once icing is fully dry to maintain freshness and decoration quality.
- The dough can be refrigerated up to 3 days or frozen for up to 1 month if wrapped well.
- Prep Time: 20 minutes
- Cook Time: 10 minutes
- Category: Dessert
- Method: Baking
- Cuisine: American
Keywords: sugar cookies, royal icing, cookie decorating, no-spread sugar cookies, holiday cookies, cookie decorating icing

