
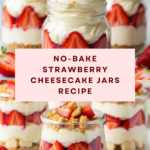
Strawberry Cheesecake Jars Recipe
Introduction
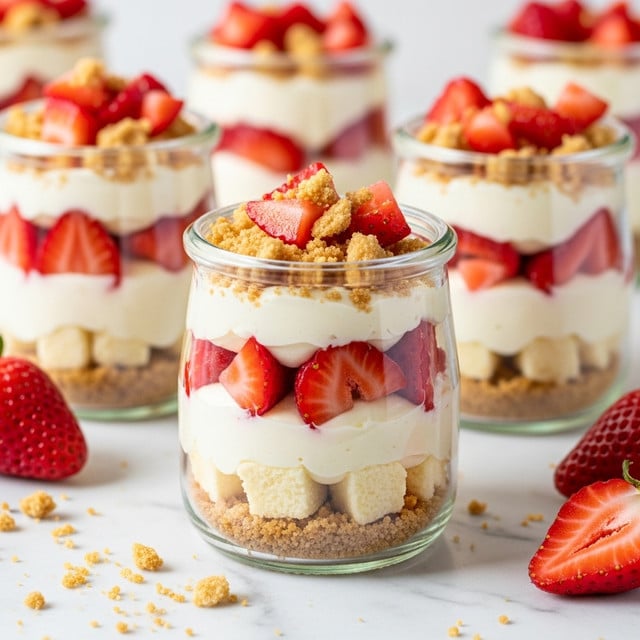
These Strawberry Cheesecake Jars are a delightful, no-bake dessert that’s perfect for any occasion. Layered with a buttery vanilla wafer crust, creamy cheesecake filling, and fresh strawberries, they offer a refreshing taste in a convenient, portable jar.

Ingredients
- 8 ounce package high-quality vanilla wafers
- 3 tablespoons unsalted butter (melted)
- 8 (8-ounce) mason jars
- 8 ounces reduced-fat cream cheese (softened)
- ½ cup plain Greek yogurt (about 5.3 ounces)
- ¼ cup granulated sugar
- ½ teaspoon vanilla extract
- Zest of 1 lemon
- 1 teaspoon lemon juice
- 1 ½ cups high-quality whipped topping (such as Truwhip)
- 4 cups hulled and quartered strawberries (divided)
Instructions
- Step 1: Place the vanilla wafers into a food processor and pulse until they become fine crumbs.
- Step 2: Pour the melted butter into the crumbs and pulse for 3–5 seconds until the mixture starts to stick together and looks clumpy.
- Step 3: Spoon about 2 tablespoons of the crumb mixture into the bottom of each mason jar. Press down slightly with a spoon; it doesn’t need to be packed tightly.
- Step 4: Refrigerate the jars to firm up the crust while you prepare the cheesecake filling.
- Step 5: In a large bowl, beat the cream cheese, Greek yogurt, and sugar on high speed until smooth and creamy. Add vanilla extract, lemon zest, and lemon juice and beat for another 30 seconds until combined.
- Step 6: Gently fold in the whipped topping and 1 cup of the strawberries into the cream cheese mixture.
- Step 7: Remove the jars from the refrigerator. Spoon 2–3 tablespoons of cheesecake filling into each jar, then add 2–3 tablespoons of strawberries. Layer the remaining cheesecake filling and strawberries evenly among the jars.
- Step 8: Seal the jars with lids and refrigerate for 1–2 hours or overnight. Serve chilled.
Tips & Variations
- For a gluten-free option, substitute gluten-free cookies for the vanilla wafers.
- Try swapping strawberries for raspberries or blueberries for a different berry twist.
- Make it extra decadent by drizzling a bit of melted dark chocolate over the top before serving.
Storage
Store the assembled cheesecake jars in the refrigerator for up to 3 days. Keep the lids tightly sealed to maintain freshness. When ready to serve, enjoy them cold straight from the fridge; no reheating is needed.
How to Serve
Serve this delicious recipe with your favorite sides.
FAQs
Can I prepare these jars in advance?
Yes, these cheesecake jars actually taste better when chilled overnight, allowing the flavors to meld together.
What can I use instead of whipped topping?
You can substitute homemade whipped cream or store-bought whipped cream if you prefer, just fold it gently into the cream cheese mixture.
Print
Strawberry Cheesecake Jars Recipe
- Total Time: 1 hour 15 minutes (including chilling time)
- Yield: 8 servings 1x
- Diet: Low Fat
Description
These Strawberry Cheesecake Jars are a delightful no-bake dessert that layers a buttery vanilla wafer crust with a creamy reduced-fat cream cheese and Greek yogurt filling, topped with fresh strawberries and whipped topping. Perfect for individual servings and easy to prepare ahead of time.
Ingredients
Crust
- 8 ounce package high-quality vanilla wafers
- 3 tablespoons unsalted butter, melted
Cheesecake Filling
- 8 ounces reduced-fat cream cheese, softened
- ½ cup plain Greek yogurt (about 5.3 ounces)
- ¼ cup granulated sugar
- ½ teaspoon vanilla extract
- Zest of 1 lemon
- 1 teaspoon lemon juice
- 1 ½ cups high-quality whipped topping (such as Truwhip)
Topping
- 4 cups hulled and quartered fresh strawberries, divided
Instructions
- Prepare the Crust: Place the vanilla wafers into a food processor and pulse until they become fine crumbs. Pour the melted butter into the crumbs and process for about 3-5 seconds until the mixture clumps together slightly.
- Assemble Crust in Jars: Spoon about 2 tablespoons of the crumb mixture into the bottom of each 8-ounce mason jar. Press down gently with a spoon; it’s okay if not packed tightly. Refrigerate the jars to firm up while preparing the filling.
- Make the Cheesecake Filling: In a large mixing bowl, combine softened cream cheese, Greek yogurt, and granulated sugar. Using a hand mixer on high speed, beat until smooth and creamy. Add vanilla extract, lemon zest, and lemon juice and continue beating for 30 seconds until fully incorporated.
- Fold in Toppings: Gently fold the whipped topping and 1 cup of the quartered strawberries into the cream cheese mixture to keep it light and airy.
- Layer the Jars: Remove jars from the refrigerator. Spoon 2 to 3 tablespoons of cheesecake filling into each jar, then add 2 to 3 tablespoons of strawberries. Alternate layering the remaining cheesecake filling and strawberries evenly across all jars.
- Chill and Serve: Seal the jars with lids and refrigerate for at least 1-2 hours or preferably overnight to allow flavors to meld. Serve chilled directly from the jars.
Notes
- For best results, use fresh, high-quality ingredients like vanilla wafers and whipped topping.
- This dessert can be prepared a day ahead, making it ideal for parties or meal prep.
- Use reduced-fat cream cheese and Greek yogurt to lighten the dessert while maintaining creaminess.
- Feel free to swap strawberries with other fresh berries like blueberries or raspberries.
- Make sure cream cheese is fully softened to avoid lumps in the filling.
- Prep Time: 15 minutes
- Cook Time: 0 minutes
- Category: Dessert
- Method: No-Cook
- Cuisine: American
Keywords: Strawberry cheesecake jars, no bake cheesecake, individual desserts, easy summer dessert, strawberry dessert, mason jar desserts


